Posts

Showing posts from July, 2022

How to Create Journal Entries via the Configuration Package in Microsoft 365 Business Central?

Image
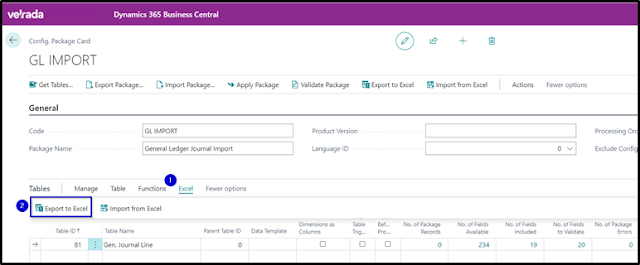
 Entering multiple General Journal lines in Business Central is a time-consuming task.  However, you can take advantage of using the Excel functionalities to prepare journal lines, use it as a template, and load the data into Business Central. Let's review the steps how to create Journal Entries via the Configuration Package. 1. Export table 81 General Journal Lines into Excel by selecting Export to Excel under Excel Fast Tab. 2. Populate required fields in the exported Excel spreadsheet. 3. To import the file, select Import from Excel under Excel Fast Tab. 4. To finalise the import, choose Apply Data under Functions . Hope you find this reading interesting. #microsoftdynamics365businesscentral    #businesscentral   #microsoftcloud   #trainingcourses   #cloudjourney   #certifications   #learning   #microsoftlearning   #functionalconsultant   #erpconsultant   #erpsoftware   #microsoft #consolidations  #transferloungeinit  #microsofttransferlounge  #microsofttransferloungelife 

How To Send Reminders of Outstanding Balances in Dynamics 365 Business Central

Image
You can use reminders to remind customers about overdue amounts. You can also use reminders to calculate finance charges such as interest or fees and include them on the reminder. Let's take a look at the steps to enable this functionality. 1. Assigned Reminder Terms to a Customer  2. To create a reminder automatically After the reminder is created, please proceed with the registration as per the screenshot below.   3. To create a reminder manually  4. To cancel an issued reminder #microsoftdynamics365businesscentral    #businesscentral   #microsoftcloud   #trainingcourses   #cloudjourney   #certifications   #learning   #microsoftlearning   #functionalconsultant   #erpconsultant   #erpsoftware   #microsoft #consolidations #intercompanies #transferloungeinit

Consolidating customer and vendor balances in Business Central

Image
When client works with a company as customer and vendor at the same time, they will want to avoid making unnecessary payments or receipts and save on transaction fees.  Microsoft has developed another feature that allows to consolidate the customer and vendor balances by  netting the difference so that either the customer or vendor balance remains, depending on which amount was bigger. Here are the steps to configure this feature in the system. 1. On the  Contact Card,  navigate to  Action, Functions, Create as   then choose if you want to change it as a customer, vendor, bank or employee. In our example, there is already a customer card in the system. 2. On Customer Card , Balance (LCY) as Vendor will show up. 3. On Payment Journal,  select prepare and Net Customer/Vendor Balances to  create payment journal lines to which the net balances for a customer and vendor are linked. Hope this will help.  Thank you for reading! #BC #BusinessCentral #Dynamics #Dynamics365 #Dynamics365BC #Dy